
Wegmans Garlic Tuscan Bread Recipe
Wegmans Garlic Tuscan Bread is known for its rustic shape, golden crust, and noticeable garlic flavor. The outside has a slight crunch, while the inside stays soft with an airy, chewy texture.
A good loaf like this needs more than a simple garlic topping. The dough, rising time, and baking temperature all play a part in its final texture.
My Wegmans Garlic Tuscan Bread Recipe focuses on these details, from mixing the dough to preparing the garlic topping. I use simple ingredients to make a homemade loaf with a similar bakery-style appearance and flavor.
Slice it for dinner, serve it with pasta, or enjoy it with olive oil for dipping.

Why You’ll Love This Copycat Wegmans Garlic Tuscan Bread Recipe
This homemade loaf has the rustic look of bakery bread without a long list of hard-to-find ingredients. Here are the details I enjoy most about it.
- Homemade Bakery-Style Bread – You can make a rustic loaf at home with a golden crust and soft center. It has the look and feel of fresh bakery bread without special baking equipment.
- Crisp Outside, Soft Inside – The covered baking method helps the loaf rise and form a crisp shell. Once you cut it, the inside has a soft, moist, and chewy crumb.
- Warm Garlic Flavor – Garlic oil goes on the hot bread after baking. The heat brings out its smell and flavor, so the garlic stays clear without covering the taste of the bread.
- Simple Dough Preparation – The dough needs no long kneading by hand. Mix it, let it rest, and use a few gentle folds to help it build strength.
- Easy to Serve – Slice the loaf for pasta, soup, salad, or a simple dinner. You can also serve it with olive oil for dipping or use it to make sandwiches.
What Makes This Bread Crust Crispy and the Inside Soft
Getting the crust and center right takes a little care. The long dough rest helps build a soft crumb, while steam and high oven heat help form the golden, crisp outside.
Long Proofing Makes the Inside Soft – The dough needs enough time to rise before baking. During this time, the yeast creates small air pockets that give the bread its light texture.
The long rest in the fridge also helps the dough develop strength and flavor. Let the shaped loaf double in size before putting it in the oven.
Steam Helps Create a Crisp Crust – I bake the loaf in a covered Dutch oven for the first 30 minutes.
The pot traps steam from the wet dough, which helps the bread expand before the crust gets firm. Removing the lid for the last 10–15 minutes lets the outside dry and turn golden and crisp.
High Heat Gives the Crust Its Golden Color – The oven needs to reach 420°F before the bread goes in. A hot Dutch oven helps the dough rise and gives the crust a good start.
I keep the lid on during the first part of baking, then remove it so the outside can brown without trapping too much moisture.
Cooling Keeps the Center Moist – The loaf may feel very hard when it first comes out of the oven, but the inside is still settling. Cutting it too soon lets steam escape before the crumb has time to set.
I let the bread cool until it is no longer piping hot before slicing. This helps keep the center soft instead of dry or gummy.
Wegmans Garlic Tuscan Bread Recipe Ingredients
This bread dough is softer and stickier than regular bread dough because it uses more water.
A few special baking ingredients help improve the texture, but you do not need all of them to make a good homemade loaf.
Bread Flour – 180g – Bread flour is the main flour in this recipe. Its higher protein content helps the dough hold its shape, even with the extra water. It also helps create a chewy center with small air pockets.
- Substitution: Use 200g all-purpose flour in place of the bread flour. Since it absorbs less water, start with less water and add more as needed.
Durum Wheat Flour (Semolina) – 20g – Durum flour adds a little extra texture to the dough. It also helps the bread hold moisture, giving the center a soft feel. Use fine durum flour or fine semolina for the best results.
- Substitution: You can leave it out and use the same amount of bread flour instead. The texture may change slightly, but the bread will still bake well.
Water – 160g – Water gives this dough its soft, sticky texture. It also helps the flour come together and allows the dough to develop as it rests.
- Tip: Use room-temperature water. When using all-purpose flour, start with less water and add the rest slowly until the dough comes together.
Sea Salt – ½ teaspoon (about 2.5g) – Salt gives the bread its basic flavor and keeps it from tasting bland. It also helps control how quickly the yeast works. Fine sea salt is easy to mix into the dough.
Yeast – ¼ teaspoon (about 1.2g) – This recipe uses a small amount of yeast because the dough rests for a long time. The slow rise helps the dough develop its flavor and creates air pockets inside the loaf. You can use instant yeast or active dry yeast. Keep the amount the same for this recipe.
Amylase Enzyme Powder – ⅛ teaspoon (about 0.5g) – Amylase is a baking enzyme that helps turn some of the flour starch into sugars. The yeast can use these sugars as the dough rests. It may also help the crust develop a deeper color.
- Substitution: You can leave it out. The bread can still bake without it, though the result may be a little different.
Ascorbic Acid (Vitamin C) – ⅛ teaspoon (about 0.5g) – A small amount of vitamin C helps strengthen the dough. This can make it easier to handle during folding and shaping, especially because the dough contains a lot of water.
- Substitution: You can skip it for a simpler homemade version. There is no need to add a vitamin C tablet unless you can measure the correct amount accurately.
Diastatic Malt Powder – ⅛ teaspoon (about 0.5g) – Diastatic malt powder helps the yeast during fermentation and supports browning in the oven. It is one of the baking aids used in this recipe to help develop the loaf’s crust and texture.
- Tip: Use diastatic malt powder, not non-diastatic malt powder. They are used for different purposes. Too much diastatic malt can make the bread’s inside gummy.
Soy Lecithin – ⅛ teaspoon (about 0.5g) – Soy lecithin is a dough improver that helps give the bread a softer center. The recipe uses only a small amount to improve the crumb.
- Substitution: This ingredient is optional. You can leave it out without adding oil or egg in its place.
Garlic Oil – For Topping – Garlic oil gives this bread its main garlic flavor. It goes on the crust after baking, so the warm loaf can release the garlic aroma as you brush it on.
- Substitution: Use olive oil mixed with finely minced garlic or prepared garlic-infused olive oil. Brush on a light layer to keep the crust from becoming greasy.
Tools Needed to Make Tuscan Garlic Bread
- Digital kitchen scale: exact weights
- Large mixing bowl: mix and rest
- Dough scraper: lift sticky dough
- Dutch oven with lid: steam and crust
- Parchment paper: easy loaf transfer
- Sharp blade or razor: clean scoring
- Floured cloth and container: shaping rise
- Small saucepan: warm garlic oil
- Pastry brush: even oil coating
- Wire cooling rack: stop soggy bottom
How to Make Wegmans Garlic Tuscan Bread at Home
This bread needs time to rest, but the hands-on work is simple. The dough starts soft and sticky, then becomes easier to handle after its long rest in the fridge.
Follow these steps to shape and bake a loaf with a crisp crust and soft center.
1. Mix the Bread Dough
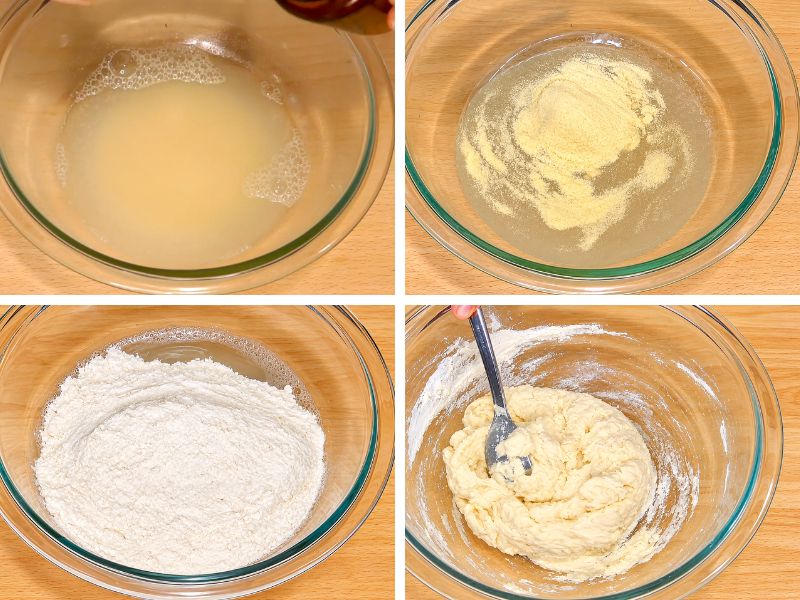
Add the bread flour, durum wheat flour, salt, yeast, amylase, ascorbic acid, diastatic malt powder, and soy lecithin to a large mixing bowl. Pour in the water and mix until all the flour is wet and no dry spots remain.
The dough will look rough, sticky, and loose. That is normal for this high-water dough. You do not need to knead it until smooth.
2. Let the Dough Rest
Cover the bowl and leave the dough at room temperature for about 1 hour. During this time, the flour absorbs the water and the dough begins to develop strength.
After resting, wet your hands and gently stretch one side of the dough up, then fold it over the center. Turn the bowl and repeat until you have folded the dough from all sides.
Keep your hands wet to prevent sticking, but avoid adding extra water to the bowl.
3. Refrigerate the Dough Overnight
Cover the bowl again and place it in the fridge for 12 to 24 hours. This slow rest gives the dough more time to develop flavor and structure.
The dough may rise slowly in the fridge. That is expected. Keep it covered so the surface does not dry out.

4. Fold and Shape the Dough
The next day, take the dough out of the fridge. Gently fold it again to build some strength. Press out any very large air bubbles, but handle the dough carefully so you do not remove all the air.
Press the dough into a rough rectangle. Fold it and roll it into a round loaf. Pinch the seam closed so the dough holds its shape.

5. Let the Loaf Rise
Place the shaped dough seam-side up in a floured proofing basket or a bowl lined with a clean, floured kitchen towel. Cover it and leave it at room temperature until it has doubled in size.
This can take less than an hour or close to 2 hours, depending on your room temperature and the dough. Use the size of the loaf as your guide rather than relying only on the clock.
6. Preheat the Oven and Dutch Oven
Place a Dutch oven with its lid inside your oven. Preheat the oven to 420°F. Let the Dutch oven heat fully before adding the bread.
The hot pot helps the dough rise during the first part of baking. It also traps steam, which helps form the crust.
7. Score and Bake the Bread
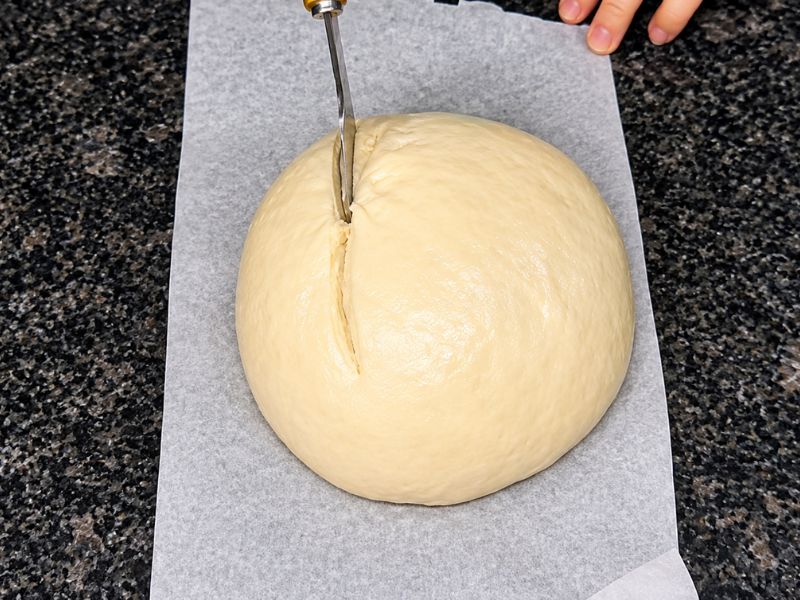
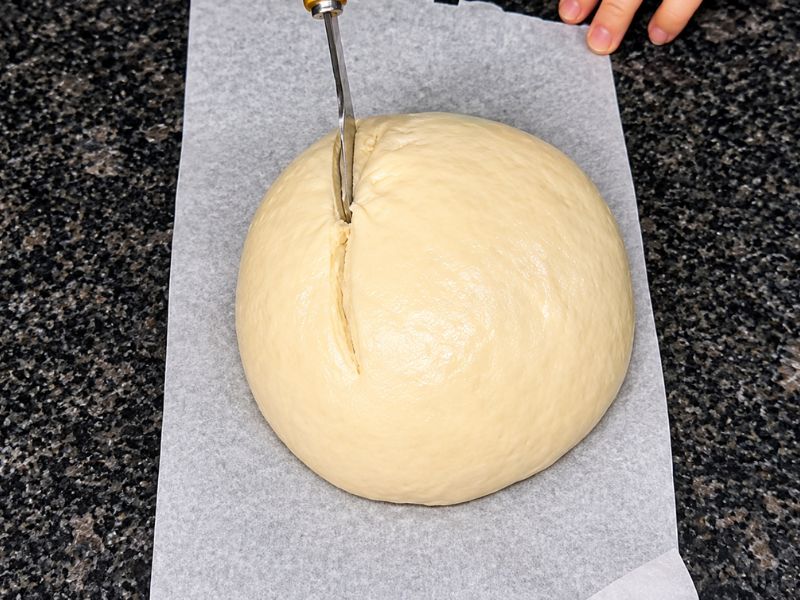
Place a piece of parchment paper over the proofed dough and carefully turn it out. Score the top with a sharp bread knife or bread lame. This gives the loaf a place to expand as it bakes.
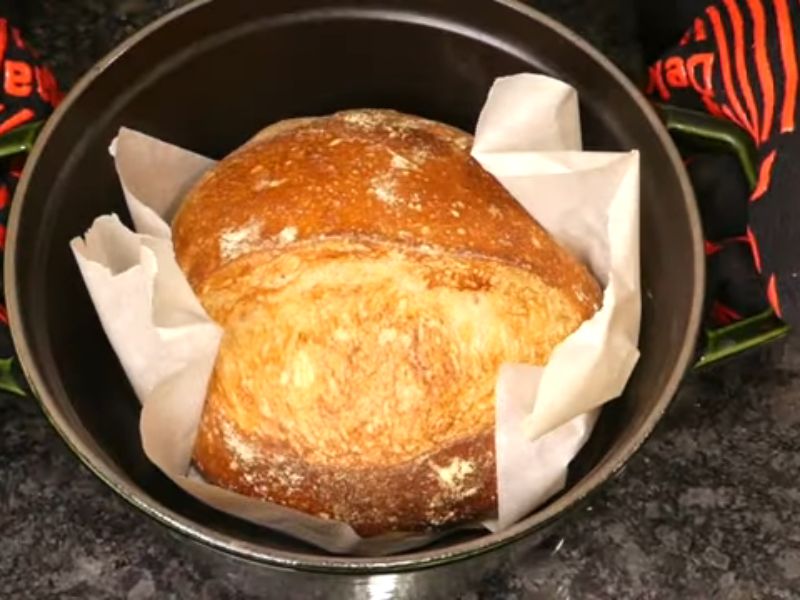
Carefully transfer the dough with the parchment into the hot Dutch oven. Put the lid on and bake for 30 minutes. Then remove the lid and bake for another 10 to 15 minutes, until the crust turns golden brown.
8. Brush With Garlic Oil Before Serving
Remove the bread from the Dutch oven and place it on a cooling rack. While the loaf is still hot, brush a light layer of garlic oil over the crust.
The warm surface helps release the garlic aroma and gives each slice its flavor. Let the bread cool until it is no longer piping hot before cutting. The crust may feel very hard at first, but it will settle as the loaf cools.
Slice and serve your homemade Wegmans Garlic Tuscan Bread.

Chef Notes & Tips for Making Soft and Crusty Tuscan Bread
A few small details can make bread baking much easier. These are the notes I keep in mind when working with wet dough and baking a rustic loaf.
- Weigh the Flour: I use a kitchen scale for better results. Flour can pack into a measuring cup, so weighing helps keep the water and flour balance right.
- Handle Wet Dough: Wet hands make sticky dough easier to fold. I avoid adding too much extra flour because it can make the finished bread dense.
- Choose Diastatic Malt: I use diastatic malt when available. It has active enzymes that help with browning and fermentation, unlike non-diastatic malt.
- Keep the Dough Covered: A covered bowl keeps the surface from drying out. A dry skin can make the dough harder to fold and shape.
- Cool Before Cutting: I know the smell of hot bread makes slicing hard to resist! Still, cooling helps keep the center soft and moist.
Prepare the Dough Ahead of Time
I like the long fridge rest because it makes baking easier to fit into a busy day. You can prepare the dough the night before and bake it the next day.
Start by mixing the dough as directed. After the first rest and folds, place it in a covered container. Keep it in the fridge for 12 to 24 hours. This slow rest gives the yeast time to work and helps the dough develop flavor.
The next day, take the dough out and shape it while it is still cool. Place it in a floured bowl or container, cover it, and let it rise until doubled in size. The time can change with the room temperature, so check the dough as it rises.
Once it has grown, bake it in the hot Dutch oven as usual. I would not skip the final rise just because the dough has already spent time in the fridge.
Both rests have different jobs. The cold rest helps the dough develop, while the final rise helps the shaped loaf become light.
My Favorite Ways to Serve Garlic Tuscan Bread
A warm slice with a crisp crust and soft center can go with many meals. I like to keep the serving ideas simple so the garlic flavor stays clear.
- Next to Soup: A warm slice is great for dunking in tomato soup, minestrone, or a hearty bean stew.
- With Pasta: Serve thick slices with spaghetti, baked ziti, or creamy Alfredo pasta. The soft center is great for picking up extra sauce.
- Salad: Serve it beside a fresh Caesar salad or a simple green salad. The crisp crust adds a nice contrast to fresh greens.
- For Sandwiches: Cut the cooled loaf into thick slices and add cheese, cooked chicken, or roasted vegetables. The soft center works well for simple sandwiches.
How to Store and Reheat Leftover Bread
Homemade bread can lose its crisp crust as it sits. I prefer to keep the loaf whole until I need a slice. This helps the inside stay moist.
Storage: Let the bread cool fully before storing it. Keep it in a paper bag or bread box at room temperature for up to 2 days.
Avoid sealing warm bread in plastic, as trapped moisture can make the crust soft. For longer storage, freeze it.
Reheating: To bring back some of the crisp crust, heat the bread in a 350°F oven for about 5–10 minutes.
For frozen slices, add a few more minutes. You can also toast individual slices in a toaster. Avoid reheating the whole loaf many times.
Wegmans Garlic Tuscan Bread Recipe FAQs
Bread baking can come with a few questions, especially when you work with a wet dough. Here are some helpful answers to keep nearby.
1. Why Is My Tuscan Bread Dough So Sticky?
This dough has a high water level compared with its flour weight. That is why it feels much wetter than regular sandwich bread dough.
Use wet hands and a dough scraper to handle it. Avoid adding large amounts of flour, as this can change the texture.
2. Can I Make This Bread Without a Dutch Oven?
Yes, you can use a baking sheet or a heavy oven-safe pot with a lid. However, the crust may turn out differently because a Dutch oven traps steam around the loaf.
For a baking sheet, use a separate oven-safe pan with hot water to create steam, taking care when handling it.
3. Why Did My Bread Spread Instead of Rising Up?
A loaf that spreads may have weak dough structure, too much water, or too much proofing time. The dough needs enough strength to hold its shape.
Use bread flour when possible, handle the folds gently, and stop the final rise when the dough has doubled rather than letting it grow too far.
4. Can I Use Fresh Yeast Instead of Instant Yeast?
Yes, fresh yeast can work in bread dough, but you need to adjust the amount. The recipe uses only 1.2g of dry yeast, so use a suitable fresh yeast conversion rather than the same weight. Fresh yeast also needs to be stored in the fridge and used while active.
5. Why Is My Bread Crust Too Hard?
A hard crust right after baking is normal for this style of loaf. It can feel firm because the outside has dried and browned in the oven.
Let the bread cool on a rack before cutting. If it stays too hard after cooling, check your oven temperature and baking time.
6. Why Does My Bread Have a Dense Center?
A dense center can come from dough that did not rise enough, weak gluten, or too much flour added during shaping. Give the dough enough time to ferment and proof.
Also, let the loaf cool before cutting so the inside has time to set.
Wegmans Garlic Tuscan Bread Recipe

Make this Wegmans Garlic Tuscan Bread Recipe at home with a golden, crispy crust, soft chewy center, and delicious garlic flavor in every slice.
Ingredients
- Bread Flour: 180 g
- Durum Wheat Flour (Fine Semolina): 20 g
- Water: 160 g
- Fine Sea Salt: ½ teaspoon (2.5 g)
- Instant Yeast or Active Dry Yeast: ¼ teaspoon (1.2 g)
- Amylase Enzyme Powder: ⅛ teaspoon (0.5 g)
- Ascorbic Acid (Vitamin C): ⅛ teaspoon (0.5 g)
- Diastatic Malt Powder: ⅛ teaspoon (0.5 g)
- Soy Lecithin: ⅛ teaspoon (0.5 g)
- Garlic Oil: As needed for topping
Instructions
- Mix the Bread Dough - In a large mixing bowl, combine 180 g bread flour, 20 g durum wheat flour, ½ teaspoon sea salt, ¼ teaspoon yeast, ⅛ teaspoon amylase, ⅛ teaspoon ascorbic acid, ⅛ teaspoon diastatic malt powder, and ⅛ teaspoon soy lecithin. Add 160 g water and mix until no dry flour remains.
- Let the Dough Rest - Cover the bowl and let the dough rest at room temperature for 1 hour. Wet your hands and gently stretch and fold the dough from all sides to build strength.
- Refrigerate the Dough Overnight - Cover the dough and refrigerate for 12–24 hours. This slow fermentation helps develop the bread's flavor and texture.
- Fold and Shape the Dough - Remove the dough from the refrigerator and gently fold it. Shape it into a rectangle, roll it into a round loaf, and pinch the seam closed.
- Let the Loaf Rise - Place the dough seam-side up in a floured proofing basket or towel-lined bowl. Cover and let it rise for 1–2 hours, or until doubled in size.
- Preheat the Oven - Place a covered Dutch oven inside the oven and preheat to 420°F (215°C). Allow it to heat thoroughly.
- Score and Bake the Bread - Place the dough on parchment paper and score the top. Transfer it into the hot Dutch oven, cover, and bake for 30 minutes. Remove the lid and bake for another 10–15 minutes until golden brown.
- Brush With Garlic Oil - Remove the bread and place it on a cooling rack. While hot, brush the crust with garlic oil as needed. Let it cool before slicing and serving.
Nutrition Information:
Serving Size:
Amount Per ServingAmount Per Serving: Calories: 106Total Fat: 1.9gSaturated Fat: .3gSodium: 125mgCarbohydrates: 19gFiber: .8gSugar: .2gProtein: 3.3g